Tag

interiordesign

Browsing

If you’re looking to elevate your home style, one simple yet effective way is to choose the right curtain pleat design. Chic curtain pleats not only enhance the aesthetic appeal of your space but also create a sense of elegance and sophistication

Among the various design elements, curtain pleats play a crucial role in the overall appearance. Pinch pleat curtains, one of the most popular styles, bring sophistication and a tailored look to any space.

What are Pinch Pleat Curtains?

Pinch pleat curtains are characterized by evenly spaced, sewn-in, permanently pinched fabric at the top, creating a structured and tailored appearance. This style is versatile and suits various decor themes, from traditional to modern.

Types of Curtain Pleats

Below is the list of Different Types of Curtain Pleats

  • Box Pleat
  • Eyelet Pleat
  • Tailored Pleat
  • Goblet Pleat
  • Pinch Pleat

Box Pleat

This pleat style features wide, flat folds that create a smooth and tailored look.

Box pleats work well with medium to heavy fabrics and are suitable for both traditional and contemporary spaces. They offer a neat and formal appeal, adding a touch of sophistication to any room.

Eyelet Pleat

Eyelet pleat curtains are designed with metal or plastic rings that are integrated into the fabric. These rings allow the curtain to glide easily along the rod, creating a modern and effortless drape.

curtain pleats

They add a touch of simplicity and can be a perfect choice for a minimalistic interior.

Tailored Pleat

Tailored pleat curtains are characterized by their precise and crisp folds. This pleat style creates a structured and elegant look, making it a popular choice for formal spaces.

curtain pleats

Tailored pleats work well with medium to heavy fabrics and provide a timeless and sophisticated appeal.

Goblet Pleat

For a touch of luxury and grandeur, consider the goblet pleat style. Goblet pleat curtains feature a cylindrical shape that resembles a wine goblet.

curtain pleats

This pleat style adds volume and drama to any space, making it ideal for formal dining rooms or master bedrooms. Goblet pleats work best with medium-weight fabrics that hold their shape well.
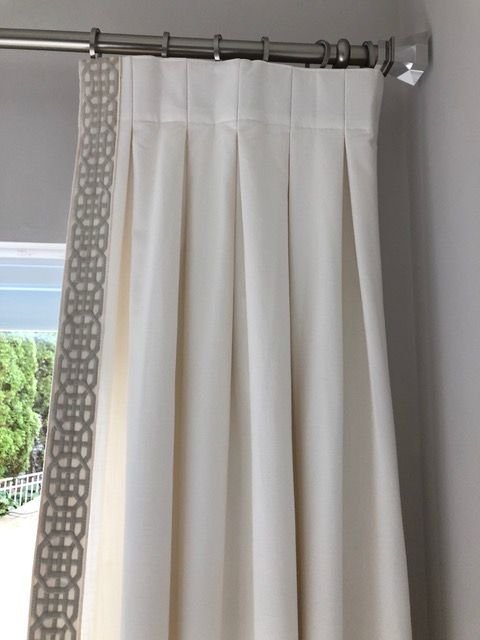
Pinch Pleat

Pinch pleat curtains, sometimes referred to as French pleat curtains, are a classic and versatile choice. This style creates evenly spaced pinched fabric folds, resulting in a tailored and structured appearance.

curtain pleats

They offer a refined and timeless elegance, making them a popular choice for many homeowners.

How to pleat curtains

To pleat curtains, you can follow these general steps:

  • Measure the width of your curtain panel and determine the spacing and number of pleats you want.
  • Mark the pleat points on the top edge of the panel, evenly distributing them as desired.
  • Pinch the fabric at each mark and secure it with pins or clips to maintain the pleat shape temporarily.
  • Sew along the pinched sections to create permanent pleats.
  • Repeat this process
  • Press the pleats with an iron to make them sharp and crisp.
  • Note: The specific steps may vary depending on the type of pleat you choose.

How to hang pinch pleat curtains

  • Install the curtain rod or track system according to the manufacturer’s instructions.
  • Slide the rings or hooks onto the rod or attach them to the track.
  • Hang the curtain panels on the rings or hooks
  • Adjust the length of the curtains as needed, allowing them to lightly touch the floor or windowsill.
  • Adjust the width of the curtains by gently pulling or pushing the fabric to achieve the desired fullness and spacing of the pleats.
  • Once the curtains are properly hung, adjust the pleats to ensure they are evenly spaced and hang evenly.

Choosing the right curtain pleat can elevate the style and ambiance of your home. With a wide range of options available, including box pleats, eyelet pleats, tailored pleats, goblet pleats, and pinch pleats, you can find the perfect match for your interior decor. By selecting chic curtain pleats, you can transform your windows into stunning focal points while adding sophistication and character to any space.

Read More

5 Easy Hacks To Transform Your Ordinary Home Look Luxurious

5 Best Smelling House Plants: Imagine coming home after a long day, and as soon as you step inside, you’re greeted with a delightful fragrance that instantly relaxes you. This can be a reality with the right houseplants. Not only do they enhance the aesthetic appeal of your home, but they also purify the air and infuse it with captivating scents.

Your home may be transformed into a fragrant haven with the help of these 5 best smelling house plants, and they require very little maintenance.

Lilly of the Valley (Convallaria majalis)

Lilly of the Valley is a small, delicate plant known for its enchanting, sweet fragrance. Its dainty, bell-shaped white flowers release a captivating aroma that is often associated with the arrival of spring.

Smelling House Plants

Here’s how you can care for this fragrant houseplant:

  • Light: Bright, indirect light is ideal for Lilly of the Valley.
  • Water: Keep the soil consistently moist but not soggy.
  • Temperature: Maintain a cool indoor temperature, around 60-70°F (15-21°C).
  • Humidity: These plants prefer high humidity levels, so consider using a humidifier or misting them regularly.

Lilly of the Valley is one of the best smelling house plants.

Gardenias (Gardenia jasminoides):

Gardenias are renowned for their stunning white blossoms and intoxicating scent. Their fragrance is often described as a mix of jasmine and roses. Cultivating a gardenia plant indoors requires some special care:

Smelling House Plants
  • Light: Gardenias thrive in bright, indirect sunlight.
  • Water: Keep the soil evenly moist but avoid overwatering to prevent root rot.
  • Temperature: Maintain a warm indoor environment, ideally between 65-70°F (18-21°C).
  • Humidity: Gardenias demand high humidity levels; use a humidity tray or mist them frequently.

Plumeria (Plumeria spp.)

Plumeria are famous for their tropical, exotic aroma, often associated with Hawaiian leis. The scent is sweet and floral, making it a fantastic choice for indoor cultivation.

Smelling House Plants

Here are some care tips:

  • Light: Plumerias love full sunlight, so place them near a south-facing window.
  • Water: Water sparingly, allowing the soil to dry out between waterings.
  • Temperature: They prefer warm temperatures, around 70-80°F (21-27°C).
  • Humidity: Plumerias thrive in moderate humidity levels, so maintain a balanced environment.

Rosemary (Rosmarinus officinalis):

Rosemary is not only a popular culinary herb but also an excellent choice for aromatic houseplants. Its woody, herbaceous scent is invigorating and can improve concentration and memory.

Here’s how to grow rosemary indoors:

  • Light: Rosemary needs at least 6-8 hours of direct sunlight daily.
  • Water: Water sparingly and allow the top inch of soil to dry out between waterings.
  • Temperature: Keep them in a warm indoor environment, around 60-70°F (15-21°C).
  • Humidity: Rosemary is not very demanding when it comes to humidity.

Eucalyptus

Eucalyptus is a beautiful plant that is reasonably simple to grow indoors. The energizing and revitalizing scent of eucalyptus is well known for clearing your respiratory passages.

Here’s how to care for it:

  • Light: Provide bright, indirect sunlight.
  • Water: Keep the soil consistently moist but not waterlogged.
  • Temperature: Maintain a moderate indoor temperature, around 65-75°F (18-24°C).
  • Humidity: Eucalyptus prefers average humidity levels, so no special requirements are needed.

Benefits of Having Fragrant House Plants:

Now that we’ve explored these delightful fragrant house plants, let’s discuss the numerous benefits they bring to your home:

  1. Natural Aromatherapy: Fragrant house plants offer a natural and non-invasive way to enjoy aromatherapy, promoting relaxation, reducing stress, and enhancing mood.
  2. Improved Air Quality: Many of these plants also purify the air by removing toxins and releasing oxygen, contributing to a healthier indoor environment.
  3. Aesthetic Appeal: Fragrant house plants add beauty and elegance to your home decor, enhancing its overall visual appeal.
  4. Connection to Nature: They bring a touch of the outdoors inside, creating a more harmonious living space.
  5. Conversation Starters: These unique plants can serve as excellent conversation starters when guests visit your home.

Tips for Maintaining Fragrant House Plants

To ensure your fragrant house plants thrive and continue to fill your home with delightful scents, consider the following care tips:

  • Regular Pruning: Trim your plants as needed to maintain their shape and encourage new growth.
  • Fertilize Wisely: Use a balanced, water-soluble fertilizer during the growing season to provide essential nutrients.
  • Repot When Necessary: If your plant outgrows its container or becomes root-bound, consider repotting it into a slightly larger pot.
  • Pest Control: Keep an eye out for pests like aphids or mealybugs and address them promptly to prevent damage

Transforming your home into a fragrant oasis is easy with the right houseplants. The Lilly of the Valley, Gardenias, Plumeria, Rosemary, and Eucalyptus are excellent choices for infusing your living space with captivating scents and are best Smelling House Plants. Not only do these plants provide aromatic benefits, but they also enhance your home’s aesthetic appeal and air quality.

Read More

Also Read

5 Easy Hacks To Transform Your Ordinary Home Look Luxurious

Plants for Skincare: How to Grow Skincare Plants at Home

Home improvement projects offer an exciting opportunity to transform your living space into a more comfortable and aesthetically pleasing environment. If you’re new to the world of DIY, don’t worry! We’ve got you covered with these five simple yet rewarding projects that will enhance your home and boost your confidence in tackling DIY endeavours. Let’s dive right in!

DIY Pantry Shelves: Organized Bliss

Is your pantry a chaotic mess with cans, jars, and boxes stacked haphazardly? It’s time to transform it into an organized oasis. These shelves will not only keep your kitchen essentials neatly arranged but also add a touch of elegance to your culinary space. With DIY pantry shelves, you can achieve both functionality and aesthetics. Start by measuring the available space and gathering your materials. A trip to the local hardware store will provide you with the necessary wood, brackets, and screws.

Image via Pinterest

Begin the Project by:

  1. Planning: Sketch your ideal pantry shelf design. Consider the number of shelves, depth, and the distance between them.
  2. Cutting: Using a saw, cut the wooden boards into the desired lengths for the shelves.
  3. Assembling: Attach the brackets to the wall and secure the wooden boards, creating sturdy shelves.
  4. Painting or Staining: Add a personal touch by painting the shelves in a colour that complements your kitchen decor or stain them to showcase the wood’s natural beauty.

By the end of this project, you’ll have not only a well-organized pantry but also a sense of accomplishment.

DIY Entryway Bench: Welcoming Elegance

Your entryway sets the tone for your entire home. An entryway bench not only offers a practical seating solution but also enhances the visual appeal of your space.

DIY Entryway Bench

Image via Pinterest

To get started, you’ll need some basic woodworking tools and the following steps:

  1. Designing: Sketch a design that suits your entryway’s size and style. Consider including storage space beneath the bench for shoes or baskets.
  2. Cutting and Assembling: Cut the wood pieces according to your design and assemble the bench frame.
  3. Finishing: Sand the wood to create a smooth surface, and then apply your chosen finish, such as paint or stain.
  4. Adding Cushions: To make your bench cozy, add cushions or pillows in a fabric that complements your decor.

Your guests will be greeted by elegance and functionality every time they enter your home.

DIY Serving Tray: Craftsmanship Unleashed

Creating a personalized serving tray not only adds a touch of sophistication to your dining experience but also allows you to showcase your craftsmanship. You can customize it to match your home decor, and it’s a fantastic accessory for hosting gatherings or enjoying breakfast in bed. Plus, it’s an ideal project to hone your woodworking skills.

DIY Serving Tray

Image via Pinterest

Here’s how to go about it:

  1. Selecting Materials: Choose wood or acrylic sheet as your base material. You can find these materials at your local craft store.
  2. Design and Cut: Design the shape and size of your tray, then carefully cut the material using a saw or specialized cutting tools.
  3. Handles and Decoration: Attach handles to the sides for easy carrying. You can also paint, stain, or decorate the tray’s surface according to your preferences.
  4. Finish: Apply a clear finish to protect your tray and make it shine.

This DIY project is an excellent way to express your style and impress your guests during gatherings.

DIY Blanket Ladder: Cozy Corner

Adding a blanket ladder to your living room or bedroom not only keeps your cozy throws within arm’s reach but also adds a rustic, decorative touch. This project is simple yet rewarding, making it a great choice for newcomers to DIY.

DIY Blanket Ladder

Image via Pinterest

Here’s how to make one:

  1. Materials: Gather wooden dowels and two long wooden boards.
  2. Assembly: Attach the dowels to the boards at regular intervals to create rungs. Make sure the ladder is stable and secure.
  3. Customization: Paint or stain the ladder to match your decor. You can also distress the wood for a vintage look.

Now, you have a stylish storage solution that also serves as a decor piece.

DIY Outdoor Chair: Relaxation Redefined

Transform your outdoor space with a DIY outdoor chair project. Whether you have a garden, patio, or balcony, this project will provide you with a comfortable seating option to enjoy the outdoors. You can personalize it to suit your style and preferences.

  1. Selecting Wood: Choose weather-resistant wood like cedar or redwood for outdoor use.
  2. Designing: Plan the chair’s design, including dimensions, backrest angle, and armrests.
  3. Cutting and Assembly: Cut the wood pieces according to your design and assemble the chair, ensuring stability.
  4. Finishing Touches: Sand the wood for a smooth finish and apply outdoor-friendly paint or sealant.

Your outdoor space will become your favourite relaxation spot, customized to your liking.

By immersing yourself in these DIY projects, you’ll not only improve your home but also gain valuable skills that will empower you to tackle more complex projects in the future. Remember, your journey into DIY begins with these simple yet impactful projects.

Gather your tools, unleash your creativity, and embark on your DIY adventure today!

Read More

Do Not Forget To Read

5 Easy Hacks To Transform Your Ordinary Home Look Luxurious

Expecting a new addition to your family? Congratulations! Now, it’s time to transform that spare room into a cozy and captivating nursery. Your baby’s first space should be both comfortable and visually appealing. To help you get started, we’ve compiled a list of 10 nursery design ideas that will turn your baby’s room into a haven of comfort and style.

Pastel Paradise:

  • Colour Palette: Create a serene and dreamy atmosphere with soft pastel hues like mint green, baby pink, and lavender. These colours are gentle on the eyes and evoke a sense of calm.
  • Elegant Touch: To add an elegant touch, incorporate accents in white, gold, or silver. This can be in the form of picture frames, lampshades, or decorative accessories.
  • Ambiance: The pastel colours combined with metallic accents create a sophisticated and tranquil nursery that’s perfect for a peaceful night’s sleep.

Pastel Paradise could be one of the best Nursery Design Ideas.

Image via in the playroom. co. UK

Nature-inspired Nursery Design Idea:

  • Design Elements: Bring the beauty of the outdoors inside by using floral wallpaper, tree decals, or woodland animal prints. These elements create a whimsical and calming atmosphere reminiscent of nature.
  • Imagination: Nature-inspired decor fosters a sense of wonder and imagination in your child as they grow and explore their surroundings.
  • Soothing Aesthetic: This theme is perfect for creating a soothing and visually appealing environment for your baby.
Nursery Design Ideas

Image via pinterest.ca

Minimalist Chic Nursery Design Idea:

  • Design Philosophy: Embrace a minimalist design philosophy with clean lines, uncluttered spaces, and a simple colour palette. Muted tones like grey and white dominate the design.
  • Warmth: To counter the starkness of minimalism, incorporate natural wood elements, such as a crib or shelving. This adds warmth and a touch of nature to the nursery.
  • Timeless Appeal: Minimalist chic design is timeless and adaptable, making it easy to transition the nursery into a toddler’s room or beyond.
Nursery Design Ideas

Image via pinterest.ca

Bohemian Bliss:

  • Eclectic Decor: Create a boho-chic nursery with a mix of patterns, textures, and colours. Think macramé wall hangings, rattan furniture, and vibrant textiles.
  • Playful Atmosphere: Bohemian design invites playfulness and creativity. It’s a style that encourages exploration and self-expression.
  • Relaxed Vibe: The eclectic and relaxed vibe of this theme is perfect for parents who want a nursery that feels cozy and inviting.

Bohemian Bliss is one of the popular Nursery Design Ideas

Nursery Design Ideas

Image via pinterest.ca

Modern Monochrome:

  • Colour Scheme: Opt for a sleek black-and-white colour scheme that exudes modernity and sophistication. Incorporate these colours into walls, furniture, and decor.
  • Geometric Patterns: Use geometric patterns in rugs, curtains, or wall art to add visual interest and a contemporary feel to the nursery.
  • Longevity: Modern monochrome design has a timeless quality, making it suitable for a nursery that will grow with your child and adapt to changing tastes.
Nursery Design Ideas

Image via pinterest.ca

Gender-Neutral Elegance:

  • Neutral Colors: Create a gender-neutral nursery using soft and calming neutral colours like beige, cream, or light gray. These tones provide a serene backdrop.
  • Sophisticated Touch: Add metallic accents or incorporate organic textures like wicker baskets or linen curtains to infuse elegance into the space.
  • Timeless Design: The gender-neutral elegance theme ensures that the nursery remains stylish and relevant over time, regardless of your child’s gender.
Nursery Design Ideas

Image via pinterest.ca

Scandinavian Sweetness Nursery Design Idea:

  • Scandinavian Aesthetic: Embrace the clean and minimalistic style of Scandinavian design, characterized by light woods, whites, and pastels.
  • Cozy Elements: To counter the minimalism, add cozy textures like faux fur rugs or knit blankets. These elements provide warmth and comfort.
  • Airy Feel: Scandinavian design creates a bright and airy nursery that feels spacious and inviting.

Image via pinterest.ca

Vintage Charm Nursery Design Idea:

  • Nostalgic Vibes: Create a nursery filled with nostalgia by incorporating vintage pieces like an antique crib, vintage-inspired wallpaper, or retro toys.
  • Classic Patterns: Mix soft pastels and floral patterns to achieve a classic and timeless look that harks back to a bygone era.
  • Sentimental Value: This theme allows you to incorporate family heirlooms or sentimental items, making the nursery truly unique.

Outer Space Adventure Nursery Design Idea:

  • Cosmic Ambiance: Transport your child to the cosmos with dark blue walls, star decals, and planet mobiles. These elements create a celestial nursery.
  • Magical Touch: Add glow-in-the-dark elements to make the nursery come alive at night, fostering a sense of wonder and imagination.
  • Exploration: An outer space theme encourages a child’s curiosity about the universe and ignites their interest in science and discovery.

Image via pinterest.ca

Animal Safari Nursery Design Idea:

  • Wild and Playful: Create a playful atmosphere with an animal safari theme. Use wallpapers or wall decals featuring animal prints, and incorporate stuffed animals as decor.
  • Earthy Tones: Choose earthy tones for furniture and accessories to evoke the feeling of being on a safari adventure.
  • Educational: This theme can also serve as an educational opportunity, teaching your child about different animals and their habitats.

Image via pinterest.ca

With these nursery design ideas, you can create a space that’s not only visually appealing but also comfortable and functional for your baby. Remember to keep safety in mind while decorating, and you’ll have a nursery that you and your baby will adore. Enjoy this exciting journey into parenthood!

Must Read

5 Easy Hacks To Transform Your Ordinary Home Look Luxurious

9 Best Ideas For Your Laundry Room Floor Tile Selection